How do I integrate the Contact Picker with Zapier?
Watch the video and read the guide below to integrate the Contact Picker with Zapier.
Zapier is a platform that lets you build automated workflows to connect 1000’s of web applications together, without needing to know how to write any code!
Here’s how to achieve that quick win.
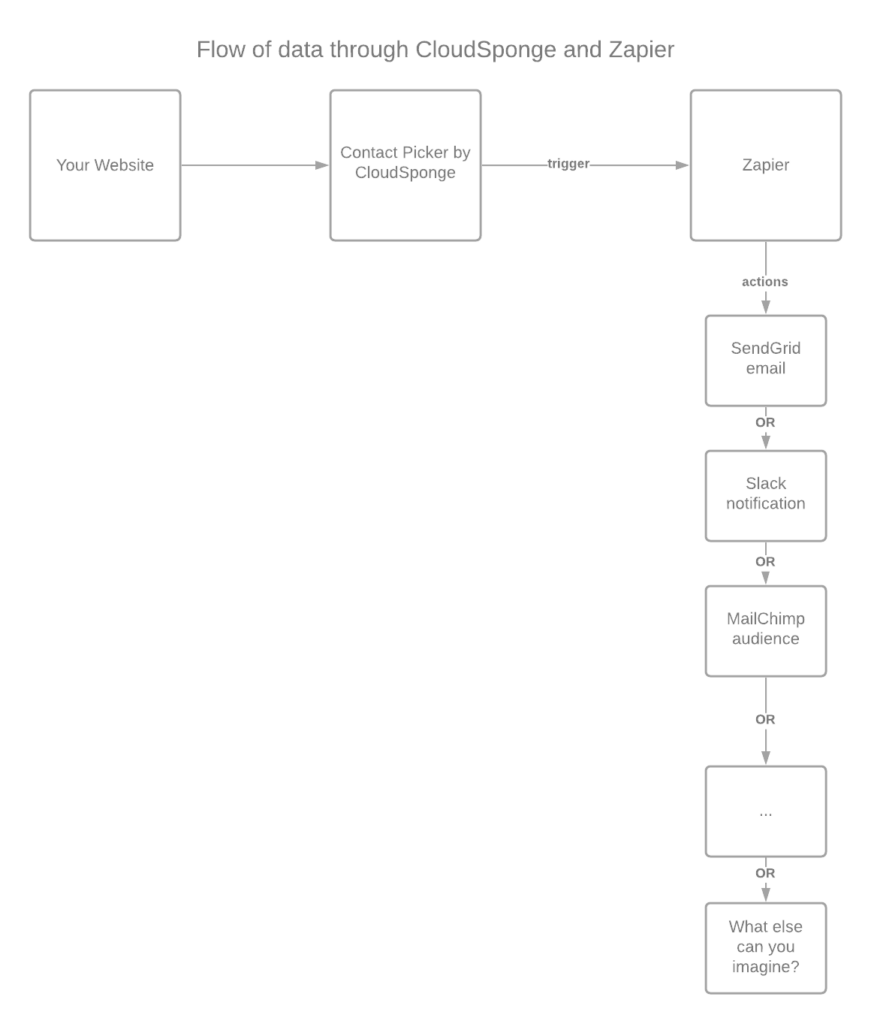
Here’s what we’re going to set up. We’ll add a script to your website that adds a referral form and Contact Picker by CloudSponge. When someone submits the form on your page, it will trigger a Zapier workflow (AKA Zap). The Zap can be set up to send an email, post a notification and just about anything else.

Install
Let’s start by setting up the Better Sharing script on your page.
Add the Better Sharing script & Contact Picker to your website (or a test page).
Add Zapier
- Set up a Zap using CloudSponge as the trigger.
- Visit our Zapier integration.
- Create a Zap that uses CloudSponge as the trigger.
- Train the Zap:
- Connect your address book.
- Pick one contact from it.
- Submit the form <- this is the action that your advocates will take when they share via email.
- Now return to Zapier and check for new data. You should see it appear.
- Notice the useful fields that Better Sharing creates for you. You can use these to personalize the emails that your system sends out.
- Set up an “action” in your Zap:
This part is up to you. I show a simple example that uses “Email by Zapier”. It’s an easy way to prove the concept and make sure all the parts are working correctly. You can always replace this action later with a more carefully branded and authenticated email service because … Zapier!
Launch
Now that you have your form set up, it’s time to send some traffic to it and measure the results. CloudSponge can help you by showing you our Better Sharing Metrics.
Reach out to us anytime by emailing support@cloudsponge.com or joining us in our Slack channel. We love this stuff and we want to do whatever we can to help you make it work for you.
Related Articles
How to I complete a basic installation of the Contact Picker?
We've written a basic installation guide, as well as, created a walk-through video to help you integrate the Contact Picker. Basic Installation Once you’ve created a CloudSponge account, you’ll get your own Snippet that you can add to any page to ...Why isn’t Google Contacts showing up in my Contact Picker?
By default, Google will not be in your Contact Picker until you start your Google OAuth project. We did this intentionally so as to not display errors to your site users. Once you start your OAuth project, Google will automatically appear in your ...How can I approve my site after launching the Contact Picker?
You need to go to your account and manually add the site to your sites section. Once you have done this, the site will be licensed and will work on your website. We're waiting to help at support@cloudsponge.com.How do I install Better Sharing?
There are two ways to install the Better Sharing plugin on your WordPress website. 1. Search and Install from the WordPress Plugin Menu. Go to: WP Dashboard > Plugins> select ‘Add New’ from the top of the page. Search the list using the keywords ...How do I add a site to my CloudSponge account?
Go to the Sites section of your CloudSponge account. After entering your website, click the green button labeled, "Add New Site." If you haven't done so, your next step is installing the Contact Picker. We're ready at support@cloudsponge.com to help ...