Create a Better Sharing email template
Here you can create and save a variety of templates for all your outgoing email needs.

The plugin includes an easy accessible list of variables for personalising outgoing emails. These can be used to include custom messages, sender’s name, and recipient details* to the email templates in order to improve the email open and conversion rates.
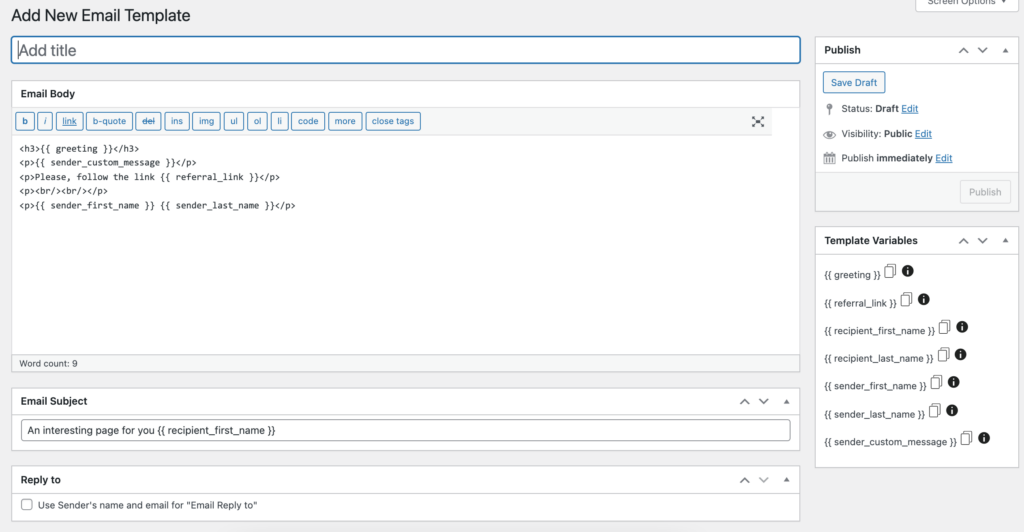
Available embed variables{{ greeting }} – use this to include an opening greeting to the email. Default is; “Hi There”{{ referral_link }} – use this to include the custom referral URL in the email body.{{ recipient_first_name }} – use this to automatically include the recipient’s first name in the email body.*{{ recipient_last_name }} – use this to automatically include the recipient’s last name in the email body.*{{ sender_first_name }} – use this to automatically include the recipient’s first name in the email body.{{ sender_last_name }} – use this to automatically include the recipient’s last name in the email body.{{ sender_custom_message }} – use this to include the sender’s custom message in the email body.
Choose to add a new template and set the following preferences for the outgoing referral emails:
- Add Title: Choose a name for the template.
- Email Body: Compose the email content here. Use the list of template variables to personalise the content for better email open and conversion rates.
- Email Subject: Add a subject for the outgoing emails. Template embed variables can be used to personalize these fields as well.
- Reply to: Check this option to allow replies to the referral emails to be be directly responded to the sender’s email address.
Once satisfied with the template, save the template by choosing to Publish from the top right publishing menu.
*recipient details are accessible via an upgrade to the Contact Picker.
Related Articles
Create a Better Sharing UI template
Selecting the "Add UI Template" option from the top of the page. Set your preferences for the look, feel, and behavior of the user interface. There are 4 tabs in UI Template creation – Main, Social Networks, Referral Link, and Email. Main The main ...Create a Better Sharing template, email template, and customize the UI
1. To insert your UI template on any page – add our Gutenberg block or shortcode If you’re using an AddOn other than the IgnitionDeck AddOn, you don’t need a UI template. For the IgnitionDeck AddOn UI template, see UI Template for IgnitionDeck 2. ...Customizing the Better Sharing Email Template for IgnitionDeck
Better Sharing automatically creates a sharing block and email template that can be further customized. The email template, located in Better Sharing » Email Templates, can be edited to accomodate custom messaging and has a set variables that are ...Add the CloudSponge Contact Picker to the Better Sharing plugin
One of the options in the Better Sharing menu is to add the Contact Picker to allow the Add from Address Book button. Simply copy your API key from your CloudSponge dashboard and paste it in your Better Sharing settings. CloudSponge Contact Picker ...Adding Better Sharing to webpage
Once installed – You will need to add your Better Sharing UI to a webpage of your choice. This can be achieved in one of two ways: Add Better Sharing from the WordPress Gutenberg Editor. Navigate to WP-admin » Pages (or Posts), Select the page to add ...